

Hello everyone!
Since I took the
decision to build a respectable British armed force for my Normandy campaign, I
thought to give it a try and be as consistent as possible.
With this
decision in mind, I started building this army from the actual beginning, which
in gun terms meant the Artillery
section. The Brits since the emergence of gunpowder relied a lot on the
assistance of artillery during their campaigns, and WW2 could not be a
different case. Its firepower had played a significant role in most of the
battles the British were involved in, and also gave a huge morale boost to the
ordinary ‘’charge-to-occupy’’ soldiers, before every attacking maneuver.
As you (who
follow my blog) know, I recently purchased a model from Airfix (#1314 AECMatador & 5.5’’ gun), and up to this day, I am waiting for some
reinforcements by post, which are three more Airfix’s Matador kits and some
figures, as the crews for the guns. It usually takes 10-12 days to get my
orders from England (country of my orders’ dispatch), so there will be coming
any day now.
Instead of
waiting like a sitting duck for the plucky Brits to show up, I did some
research through the net, and found some interesting photographic material
showing all sorts of details for these weapons. What I couldn’t find to buy for
my 5.5’’ guns, was ammo crates. Well, to be honest there are some excellent
models from Accurate Armor, but unfortunately they come out in 1/35
scale, so these models weren’t going to be of much use!
To do what I had
in mind, I wouldn’t let some minor implications discourage me. That’s why I
decided to make some ammo crates of my own – made by me - M(iniatures)
T(errain) P(age) copyright! :-)
And, in order to
give you an idea of how easy it is to make some for your arty pieces, I will
post a sequence of photos of every step of the making process.
(In the end I
will make a book with my tutorials and I will start selling it, but as I come to
think of it, they are already available on the net…oh bugger! Chance:
missed!)
We live in a
different world nowadays, so I reckon it’s better to drop keys instead of
building cages, especially for such an important thing as our hobby.
On with the
tutorial then!
Part 1.
I took a sheet
of 0.5 cm balsa, and I marked (with a simple ball point pen), two lines of 3cm
width.
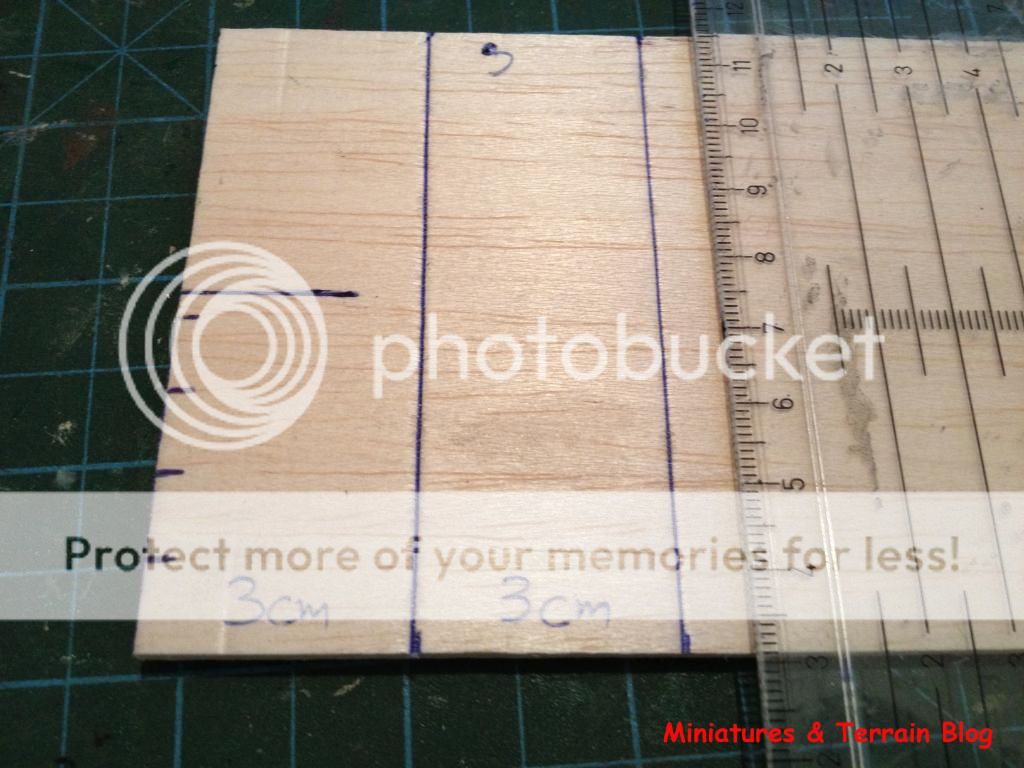
Part 2.
I then marked
vertical internals of 1cm each (photo explaining). Between each 1cm crate, and
with the help of my pen and my ruler, I marked some lines on every one of them,
so as to give the impression of wood plunks glued together to make the crate.

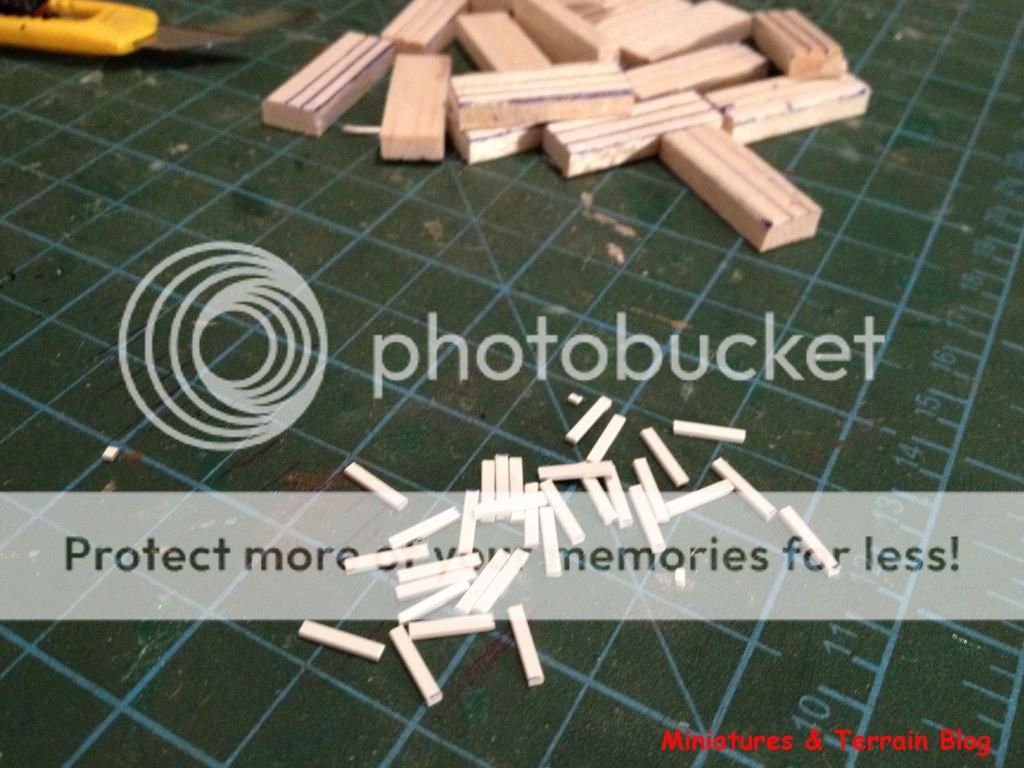
Part 3.
I cut them (you
can see the small pile).

I then took a
strip of plastic (0.1 cm width) and cut some small pieces (0.8 cm/each) out of
it. I was going to use three pieces of plastic for every crate (below you see
the pile).

Part 4.
I then glued
these fiddly pieces of plastic vertically, onto the wooden ‘crates’ .


Part 5.
I then took a
strip of plastic (0.2 cm width) and cut some small pieces (0.4 cm/each) out of it.
I was going to use four pieces of plastic for every crate (in the next phase
you will see why).

Part 6.
I then glued
these fiddly pieces of plastic vertically, onto the sides of the wooden
‘crates’, as holsters .


Part 7.
I then painted
the whole lot with a brown colour. When dry, I used some brown wash (GW Devlan
Mud) and when this wash got dry as well, I drybrushed the crates with the brown
that was used as the base colour.


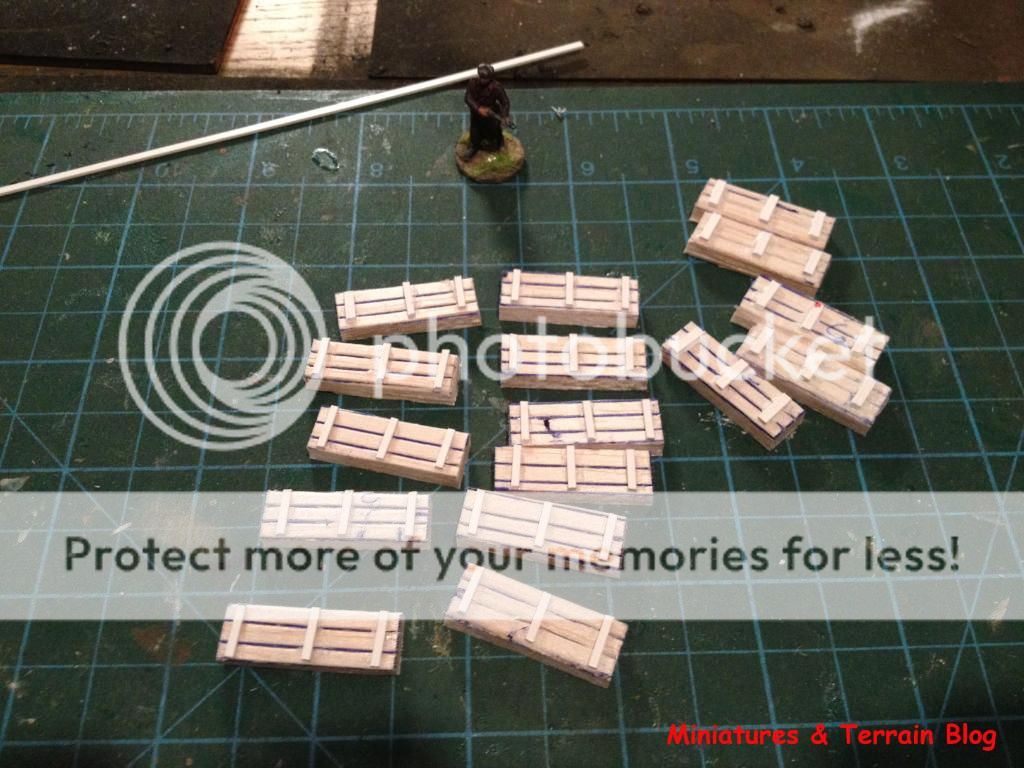
Part 8.
The crates: considered: finished!
Below you see
the full array of these crates. Unfortunately, I haven’t found any brass rods
to make small pieces of used cartridges and place them next to the crates, but
I think I’ll manage to find some in the future, so stay tuned for perhaps a new
tutorial (as if you needed another). :-)


I hope you found
this tutorial useful.
C & C are,
as usually, more than welcome!
From warm (as usually) Athens, have a good night!
T.


Your a talented individual Thanos, Ray says it's sickening!
ReplyDeleteSickenly good!!
ReplyDeleteThanos, you've done a great job with the tutorial here and I greatly appreciate it. Things like this help me ever so much as I am still learning. And these crates looks as good as or even better than what one would buy from a manufacturer.
ReplyDeleteGreat modeling and how-to do instructions, sir.
ReplyDeleteAnother great tutorial, you're the best
ReplyDeleteA great tutorial Thanos, very helpful.
ReplyDeleteSuperb tutorial Thanos; I love the way you clearly illustrate the process. Great work Sir.
ReplyDeleteThese are excellent Thanks Thanos
ReplyDeleteNo need for cartridge cases. 5.5 gun uses bagged propellant
ReplyDeleteFurther to above: Not meaning to be an anonymous nit-picker, I just don't have an account that allows me to post with an identity. For my 155mm long tom I made propellant bags from Milliput painted white with red ends. Enjoyed your tutorial MIKE
ReplyDeleteClever, clever, clever.
ReplyDelete